Tape-ins and wefts often take center stage, but another method has equal star power. Behind the curtain lies an extension that combines all the best features of your hair heroes—an adhesive- and heat-free installation, a discreet application point, ponytail potential, and an easy removal... Enter the I-tip extension.
New to I-tips or need a refresher on this all-around extension? We’ve got you covered with everything there is to know about I-tip extensions—and then some.
What Are I-Tip Extensions?
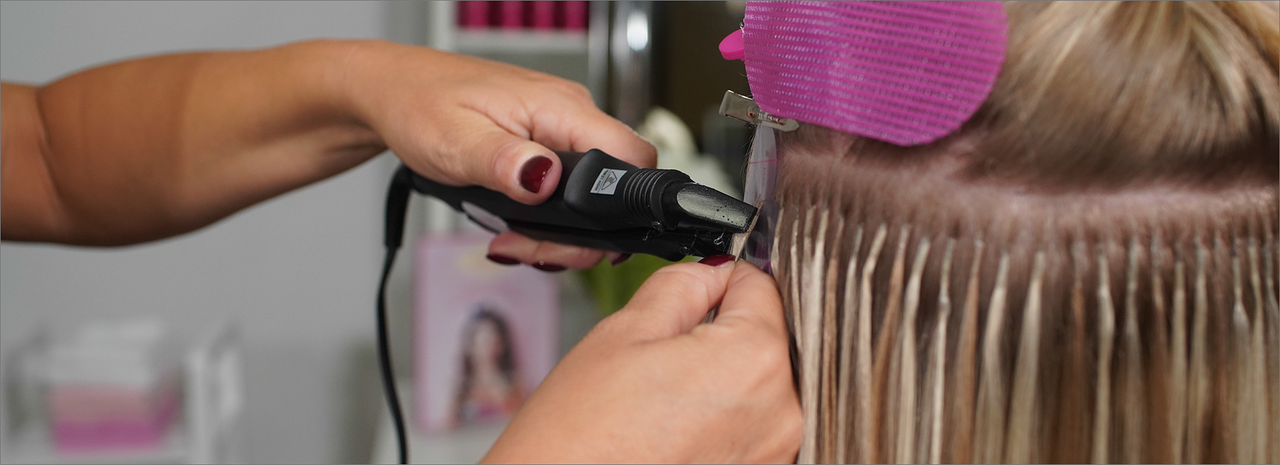
While you may have heard I-tips referred to as microbead extensions, micro-link extensions, stick tip extensions, or cold fusion extensions, these terms all refer to a type of attachment that uses small beads to hold each strand in place. Unlike wefts (which weave hairs together to form a wide sheet), I-tips take a more targeted approach to adding volume. Stylists install each extension strand-by-strand for flexible, 360-degree natural movement.

What Are I-Tip Extensions Made Of?
I-tips can be formed from synthetic fibers or real human hair, although extension quality will vary significantly based on which material a company chooses. Synthetic strands stand out in the natural hair (hello, noticeable extensions), can’t endure heat styling, and often fray or fade quickly.
On the other hand, I-tips comprised of Remy human hair remain the gold standard in the hair extension industry. Using equipment called “Machine Remy,” manufacturers sort bundles of hair until the cuticles run in the same direction. The phrase “100% Remy” indicates that every cuticle has a consistent direction (AKA strong, durable strands).
All Babe I-Tip Extensions are 100% Remy human hair, processed with a gentle treatment.
What Are the Benefits of I-Tip Extensions?
- Kind on the hair: no heat, glue, or adhesives needed for installs!
- Beginner-friendly: new extension wearers will enjoy I-tips' easy maintenance.
- Reusable: stylists can reapply the same strands one to three times.
- Vibrant color options: I-tips' strand-by-strand application suits bold pops of color.
- Natural blend: the small application point is unnoticeable in the natural hair.

How Are I-Tip Extensions Sourced?
Maintaining strict sourcing criteria not only ensures that all hair donors are shown respect, but also that extension wearers enjoy the most long-lasting transformations possible. At Babe Hair, we source and manufacture our products only with partners who abide by our Supplier Code of Conduct which includes labor hours and compensation standards, safety and environmental protections, and business-integrity guidelines.
How to Install I-Tip Extensions
All set to start your first I-tip transformation? Remember that Babe I-Tip Extensions should only be applied by a licensed stylist. For a full-head installation, expect at least a two-hour appointment, and follow the steps outlined below:
- Part the hair: create a T-shape parting (one large section at the back and two equal sections at the sides) with a Quick Pick.
- Attach the Quick Change Beads to the Anchor: fasten the Quick Change Anchor onto the small bottom loop.
- Create a small section of hair: part off a square section approximately ¼" by ¼" that matches the thickness of the extension strand.
- Insert the hair section through the loop: slide a bead upward and thread it onto the hair.
- Place the extension strand inside the bead: ensure the hair is flowing straight down.
- Secure the extension: clamp the bead in place with the Hair Extension Tool.
- Move to a new section: Rows should be approximately ¾"- 1” apart for fine hair and ½" apart for medium to thick hair.
- Repeat until the natural hair is well covered: working upward in horizontal rows until reaching the crown of the head.

How Long Do I-Tip Extensions Last?
If I-tips are shown all the love and care they deserve, these extensions last three to six months. After an initial application, I-tips can be reused and reinstalled one to three additional times with new beads. Stylists should complete these touch-ups every eight to ten weeks to maintain the hairs’ integrity and avoid product buildup.
Anyone who prefers to stretch out their salon visits will appreciate the longer window between I-tip appointments (as opposed to more frequent tape-in touch-ups).
Which Hair Type Works Best for I-Tips?
Unlike other methods which require thick hair, such as machine wefts, I-tip extensions are one of the best options for those with finer hair densities. Through the strand-by-strand approach, less weight and tension are placed on the scalp—stylists just need to be sure to leave enough hair to conceal the beads. But those with thick hair can enjoy the pluses of I-tips too! Stylists just need to use extra extension packs to work their magic and match the density of the natural hair.
Even those with short hair can sport I-tips, so long as they have at least four inches of natural length to conceal the attachment point.
Do I-Tip Extensions Damage Your Hair?
I-tip extensions are one of the best options for those concerned about the effects of chemical removers, heat, and adhesives! Plus, because stylists can pick and choose the specific areas in need of volume, I-tip wearers don’t need to put on a piece that weighs down the scalp.
How Many I-Tip Extensions Do I Need?
There’s nothing worse than being short an extension pack mid-installation. Before ordering extensions, stylists should first determine their client’s hair goals and texture. For those who just want to build fullness in targeted areas, one to two packs of I-tips will do the trick (each Babe I-Tip Extension package includes 20 strands). For full-head transformations, fine to medium hair applications will need three to six packs, while medium to thick hair applications will need seven to ten packs.
How Do You Maintain I-Tip Extensions?
Pamper your I-tips and they’ll stay just as shiny as the day they left the salon! To preserve the scalp’s natural oils, limit hair-washing days. Avoid product buildup by not applying conditioner too close to the attachment point. Never sleep with wet hair and tie it back in a loose ponytail or braid before bed. You may want to consider a silk pillowcase to reduce hair snagging on cotton fibers. Before pulling out a curling wand, make sure the device is extension-safe and not set at a temperature above 300°F.
Anyone who enjoys being active, from hot yoga to running, should take extra precautions to protect their freshly installed I-tips. Sweating can dry out the extensions and cause mineral build-up, so make sure to always gently wash and brush the hair after exercising. Summer activities can also be especially harsh on unprotected hair. Prevent discoloration from chlorine, salt, sunscreen, and tanning products by mixing a little water with a deep conditioning mask. Lightly apply the mixture from mid-lengths through the ends (preferably in a spray bottle).
I-Tip Hair Extensions Before and After
Ready to test your own creativity? Check out one of our favorite transformations below that encapsulates the bold, vibrant potential of I-tip extensions!


